3D SCANNING | THE POINT CLOUD AND MESH
Video with English subtitles:
Hi everybody!
Welcome to the second part of the 3d-scanning with photo camera tutorial. In the previous part I showed you how to shoot objects for photogrammetry. And in this tutorial you will learn how to build the point cloud from the pictures we took, and how to build the high-poly mesh with the texture.

For this, we need two programs and a one addition:
- Visual SFM
- MeshLab
- CMVS (addition for Visual SFM)
To set up CMVS, you have to unzip CMVS archive, copy content of the Win64-VS2010 or Win32-VS2010 folder (depends on your system) into the VusialSFM folder.
Also you can use my pictures set if you don't have your own.
Let's get started!
First of all we have to import our pictures into Visual SFM.
To do that go to "File" -> "Open Multi Images" and select your photographs. Now we wait for the program to import the pictures. After all of the pictures have been imported you will see appropriate information in the Log window.

Next we have to press the "Compute Missing Matches" button. After this button is pressed, the program will start calculations. This will take few minutes.

Right after completion of the calculation we need to press the "Compute 3D Reconstruction" button. And again wait a bit.

Next step is starting the building up of the dense point cloud. After pressing the "CMVS" button, we have to set a path and name for the file. Let's create new folder named "Model" and set the file name "Model" in there. The program will start to build the dense point cloud.

After completion of the calculation, you will see the time spent for the building of the dense point cloud. At first glance nothing has changed in the scene, but if you will press the TAB button on your keyboard you can see the dense point cloud.

After this, we no longer need Visual SFM.
Let's open the MeshLab program, press the "Open Project" button and select the file we generated earlier in Visual SFM. In my case it's "Model.nvm". Wait until the program imports the point cloud.

Next, press the "Show Layer Dialog" button to see the list of project's layers.

Then go to "File" and press "Import Mesh". Select the "Model.0" file which has also been generated in Visual SFM.

After importing this you will see that the two point clouds have been overlaid on each other.

Before generating of the high-poly mesh we have to remove all unwanted vertices from the DENSE point cloud. To do that choose the "Select Vertices" tool and select all unwanted points. After that, press the "Delete" button.

After deleting the extra points go to "Filters" -> "Point Set", and select "Surface Reconstruction: Poisson".

In the resulting window you will see four parameters. Set "Octree Depth" to 12. This parameter is responsible for the speed/quality of the reconstruction. Set "Solver Divide" to 8. These properties are most optimal for the speed and quality. Now we have to wait several minutes until the program builds up the high-poly mesh.

Once the mesh is built we can disable the point cloud. Then choose our mesh and go to "Filters" -> "Selection" and click "Select non Manifold Edges".

Then press "Apply" and press "Delete" on your keyboard. This must be done for the correct generation of the UV (texture coordinates).
Now we can generate the texture. To do that go to "Filters" -> "Texture" -> "Parameterization: texture from registered rasters".

Make the texture size big, because automatically generated UVs have non optimal space usage. All other parameters leave as default. Click "Apply". Once the process is finished you will see your mesh with the texture. Now you can close this window.

We are finished in Meshlab now. The last thing we need to do - export the model into a regular format for 3d-editors.
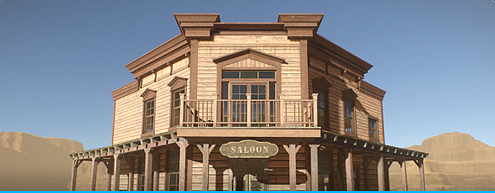
Result of this tutorial:
Well, the second episode is finished. Subscribe to my newsletter (the button is on the right), if you don’t want to miss the last episode, in which you’ll learn how to create a useful topology and prepare this model for use in a game engine.
Check out game-ready assets made with photogrammetry.
<Previous part
Good luck with your scans! :)
Hi everybody!
Welcome to the second part of the 3d-scanning with photo camera tutorial. In the previous part I showed you how to shoot objects for photogrammetry. And in this tutorial you will learn how to build the point cloud from the pictures we took, and how to build the high-poly mesh with the texture.
For this, we need two programs and a one addition:
- Visual SFM
- MeshLab
- CMVS (addition for Visual SFM)
To set up CMVS, you have to unzip CMVS archive, copy content of the Win64-VS2010 or Win32-VS2010 folder (depends on your system) into the VusialSFM folder.
Also you can use my pictures set if you don't have your own.
Let's get started!
First of all we have to import our pictures into Visual SFM.
To do that go to "File" -> "Open Multi Images" and select your photographs. Now we wait for the program to import the pictures. After all of the pictures have been imported you will see appropriate information in the Log window.
Next we have to press the "Compute Missing Matches" button. After this button is pressed, the program will start calculations. This will take few minutes.
Right after completion of the calculation we need to press the "Compute 3D Reconstruction" button. And again wait a bit.
Next step is starting the building up of the dense point cloud. After pressing the "CMVS" button, we have to set a path and name for the file. Let's create new folder named "Model" and set the file name "Model" in there. The program will start to build the dense point cloud.
After completion of the calculation, you will see the time spent for the building of the dense point cloud. At first glance nothing has changed in the scene, but if you will press the TAB button on your keyboard you can see the dense point cloud.
After this, we no longer need Visual SFM.
Let's open the MeshLab program, press the "Open Project" button and select the file we generated earlier in Visual SFM. In my case it's "Model.nvm". Wait until the program imports the point cloud.
Next, press the "Show Layer Dialog" button to see the list of project's layers.
Then go to "File" and press "Import Mesh". Select the "Model.0" file which has also been generated in Visual SFM.
After importing this you will see that the two point clouds have been overlaid on each other.
Before generating of the high-poly mesh we have to remove all unwanted vertices from the DENSE point cloud. To do that choose the "Select Vertices" tool and select all unwanted points. After that, press the "Delete" button.
After deleting the extra points go to "Filters" -> "Point Set", and select "Surface Reconstruction: Poisson".
In the resulting window you will see four parameters. Set "Octree Depth" to 12. This parameter is responsible for the speed/quality of the reconstruction. Set "Solver Divide" to 8. These properties are most optimal for the speed and quality. Now we have to wait several minutes until the program builds up the high-poly mesh.
Once the mesh is built we can disable the point cloud. Then choose our mesh and go to "Filters" -> "Selection" and click "Select non Manifold Edges".
Then press "Apply" and press "Delete" on your keyboard. This must be done for the correct generation of the UV (texture coordinates).
Now we can generate the texture. To do that go to "Filters" -> "Texture" -> "Parameterization: texture from registered rasters".
Make the texture size big, because automatically generated UVs have non optimal space usage. All other parameters leave as default. Click "Apply". Once the process is finished you will see your mesh with the texture. Now you can close this window.
We are finished in Meshlab now. The last thing we need to do - export the model into a regular format for 3d-editors.
Result of this tutorial:
Well, the second episode is finished. Subscribe to my newsletter (the button is on the right), if you don’t want to miss the last episode, in which you’ll learn how to create a useful topology and prepare this model for use in a game engine.
Check out game-ready assets made with photogrammetry.
<Previous part
Good luck with your scans! :)